Some of the common uses of FDM 3D printing include rapid prototyping, product development, tool making, as well as the manufacturing of functional parts. Nevertheless, thanks to its accessibility and affordability, FDM 3D printing is also an extremely useful tool when it comes to hobbyistic uses such as customized modeling, cosplay, home decor, miniature making, gaming accessories, etc.
In this article we will present 5 inspiring projects that can be carried out with the help of desktop FDM 3D printers.
LEGO and LEGO Duplo parts
LEGO, the iconic Danish toy company, sparks creativity and imagination with its interlocking plastic bricks. Since 1932, LEGO has captivated generations, promoting problem-solving and technical skills, and providing endless building possibilities. From simple structures to themed sets, LEGO continues to inspire joy and playfulness worldwide.
Video 1: 3D print your own LEGO bricks with Prusa. Source: Prusa3D.
Original LEGO bricks are made using injection molding technology and although FDM 3D printing cannot recreate that kind of precision (up to 0.01 mm) and great surface finish, it comes pretty close when the right material and post-processing methods are used. With a well-calibrated, well-leveled, and well-maintained 3D printer it is possible to achieve satisfying results with FDM 3D printing by tweaking the wall thickness of the parts and other printing parameters in the laminating software. After some experimenting, it is possible to 3D print complete customized LEGO sets and even blocks that will be compatible with original LEGO pieces.
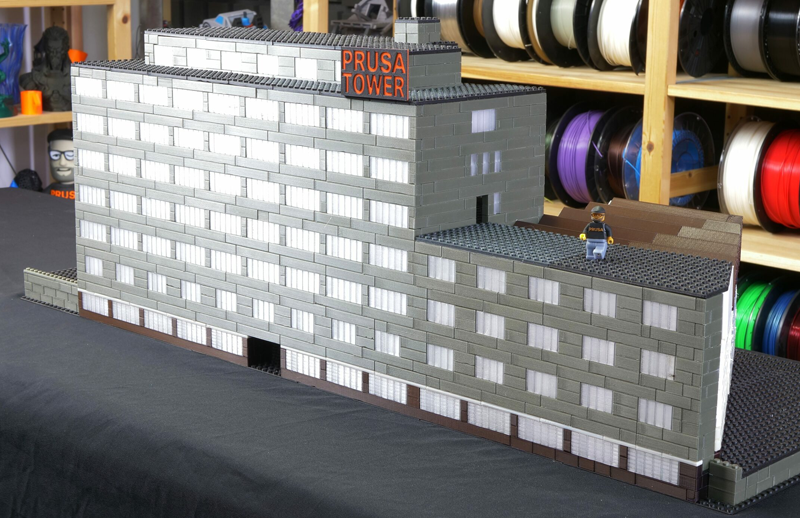
Image 1: A model of the Prusa headquarters build with 3D printed LEGO bricks. Source: Prusa3D.
3D printing your own LEGO blocks has its limitations in terms of cost and time. 3D printed LEGO parts require time-consuming post-processing such as brim removal and possible smoothing with acetone if the material is ASA/ABS which implies more cost and time investment. This is why FDM technology is great for making special customized parts or missing spare parts for LEGO sets, or even larger LEGO sets, but not very affordable for mass production.
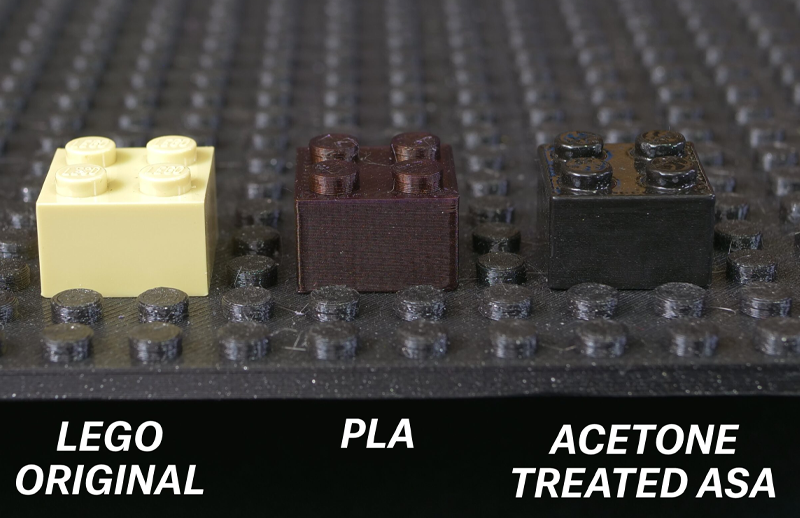
Image 2: Comparison of an original LEGO brick and 3D printed LEGO bricks. Source: Prusa3D.
One things that is not recommended to print with FDM technology are very small or fragile parts such as the details of the LEGO mini figures (here SLA 3D printing is the better choice). As far as FDM materials, it is recommended to use ABS (the material of the original LEGO bricks) due to its abrasion resistance and the possibility to smooth the parts in an acetone bath. Another grat alternative is ASA which is slightly easier to print and post-process than ABS. PLA is not recommended since the parts may lose their fit with time due to abrasion.
It must also be kept in mind that LEGO is a registered trademark, and manufacturing and circulating exact replicas of LEGO bricks without the brand's legal permission will have legal consequences. Nevertheless, 3D printing customized sets or compatible parts and accessories for one's own hobbyistic use is a great idea.
Another important point to be aware of is that 3D printed LEGO parts may not be suitable for small children due to the force required to connect parts printed with PLA, as well as the potential toxicity of parts 3D printed with SLA technology.
There are many open-source LEGO brick designs available on the internet, for example the LEGO parts designed by Prusa3D that can be successfully printed on the Original Prusa i3 MK3S+ printer.
Picture or photo in 3D
Are you looking for an original gift or decor and you want to go beyond just placing a developed picture in a photo frame? This FDM 3D printing project is for you. You can turn your child's drawing, the logo of your company, your favorite band or sports team, or a photograph into a 3D object without the need to dominate the use of advanced 3D modeling programs such as Fusion360, Blender or SketchUp.
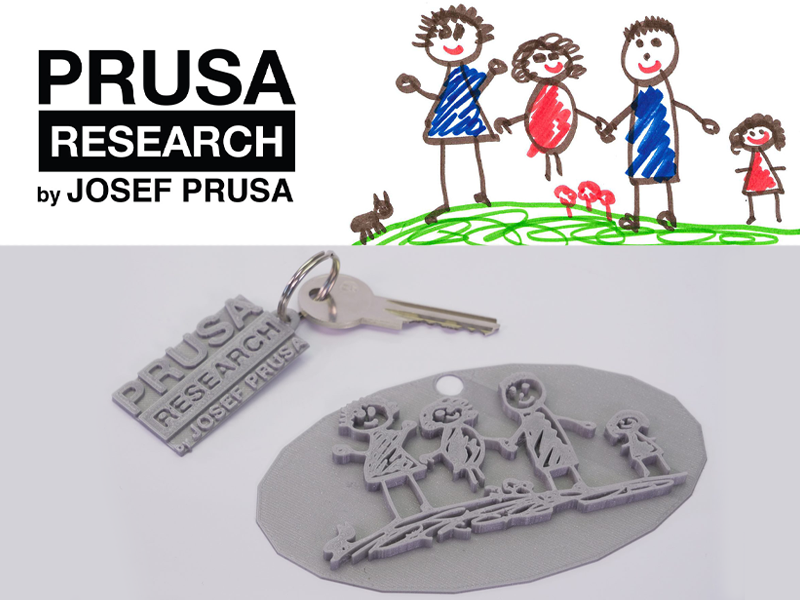
Image 3: Keyrings 3D printed from a drawing. Source: Prusa3D.
The first option involves the free Selva tool and these are the steps:
- First, you must choose a picture that is not too complex and has clearly separated colors with sharp transitions (otherwise a nozzle with a 0.25 mm diameter or smaller will be requried).
- Next, scan the image with the highest DPI possiblel for ultimate quality and "clean" the image in photo editing software to remove background or improve color transitions.
- Upload the picture to the Selva tool and proceed to modify it with the "Threshold" and "Height" tools to achieve the desired effect.
- Save the image using the "Download a Standard Quality STL for free" button.
- Use laminating software of your choice to prepare the design for printing and ... ready!
The second option for turning a photo into a 3D object is by making a litophane. A lithophane is a translucent or transparent artwork created by carving or etching a design onto a material, such as porcelain or ceramics, with varying thickness.
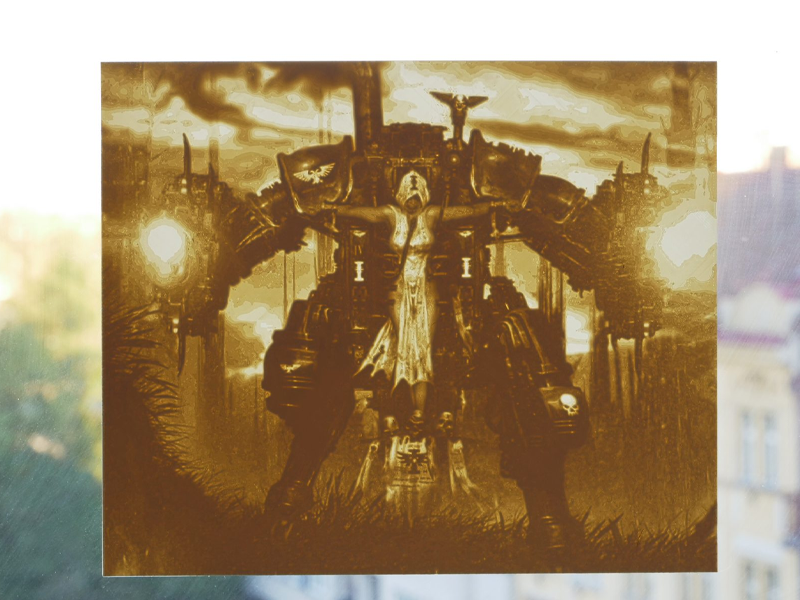
Image 4: A litophane 3D printed with FDM technology. Source: Prusa3D.
When illuminated from behind, the image becomes visible with shades and details, forming a three-dimensional effect. This can be done with FDM 3D printing in the following way:
- Upload the photo or picture of your choice to this free online tool. It is recommended to use a photo with 500×500 resolution or lower.
- Once the 3D model has been automatically generated, you should adjust 2 model generation settings: convert the positive image into a negative image, and set the thinnest layer to 0.4 mm.
- Download the model and open it in your laminating software.
- Switch the layer height to 0.10 mm (or 0.05 mm with a 0.25 mm nozzle).
- Set the following values in "Print settings - Layers and perimeters": Perimeters: 1; Solid layers Top: 1; Solid layers Bottom: 1.
- Set infill to 95 % rectilinear.
- Do not resize the object in the Z axis as it will distort the flow of light through the image.
With this tried and tested Prusa setup and the right filament color (white, creamy, silver or purple are best), you will have your own 3D printed litophane. You can further improve the 3D pritned litophane by coloring the back of it with standard color markers.
Tabletop RPGs and accessories
Tabletop RPGs gained popularity in the 70s and 80s, providing a unique experience of face-to-face interaction and physical components. Initially "pen and paper" games, they evolved with packaged versions. This is when 3D printing comes in, offering tabletop RPG fans the chance to 3D print their own customized objects and accessories, thus enhancing the immersive experience of tabletop RPGs.
Video 2: 3D printing Dungeons & Dragons miniatures on a Prusa 3D printer. Source: Prusa3D.
In the recent years, a number of initiatives have surfaced in the tabletop RPG community that contribute to the development of standards that ensure the compatibility of 3D-printed terrain and set pieces with the original RPGs. These most popular initiatives include OpenLock, OpenForge, DragonLock and Rampage. These standards provide free downloadable files that allow users to 3D print and assemble various components, such as walls, floors, doors, buildings, barricades, ruins and other elements, which can then be combined to create custom game maps.
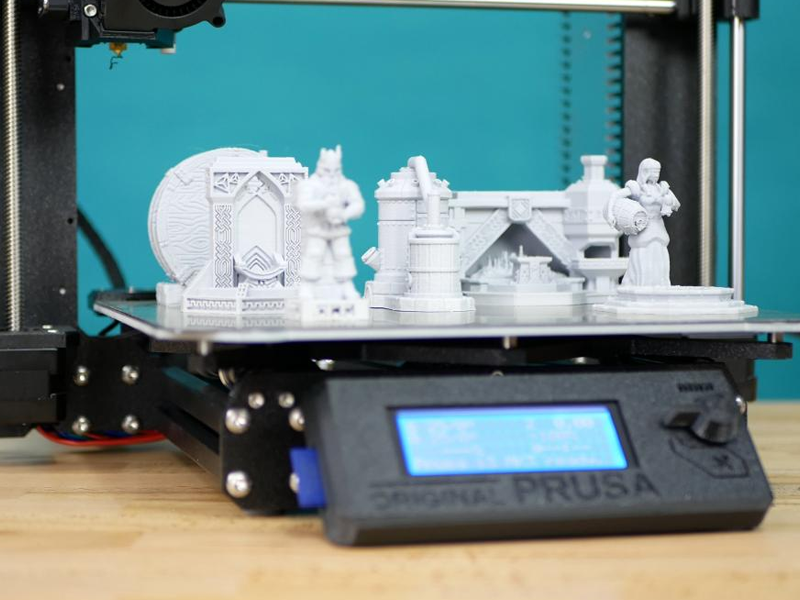
Image 5: 3D printed scenery for a tabletop RPG. Source: Prusa3D.
Some great sources of 3D printable wargaming accessories for games like Warhammer 40K are Thingiverse and MyMiniFactory. More advanced paid elements such as barrels, chests, cabinets, torches, traps, puzzles, etc., are available on websites such as Printable Scenery or Infinite Dimensions. Fans of tabletop RPGs are not only limited to scenery. With the help of websites such as HeroForge or Desktop Hero you can create 28-30 mm tall customizable tabletop people miniatures using a simple, user-friendly web-based application. All these 3D printed elements can of course be further customized by being painted with acrylic colors.
Since miniatures like that can contain tiny elements such as weapons, it may be challenging for FDM technology. Nevertheless, it is possible to 3D print miniatures successfuly. Some recommendations for satisfying results are to minimize supports, use 0.10 mm layer height, 100 % infill and place multiple models next to each other.
Photography gadgets
From lens hoods and filters to tripod mounts and camera grips, 3D printed accessories provide photographers with customizable and cost-effective solutions to costly or hard-to-find accessories. The versatility of 3D printing technology allows for intricate designs and lightweight materials that are durable and practical for various shooting conditions. With the ability to easily adapt and modify designs, photographers can experiment with unique accessories tailored to their specific needs, opening up new avenues for artistic expression and pushing the boundaries of traditional photography.
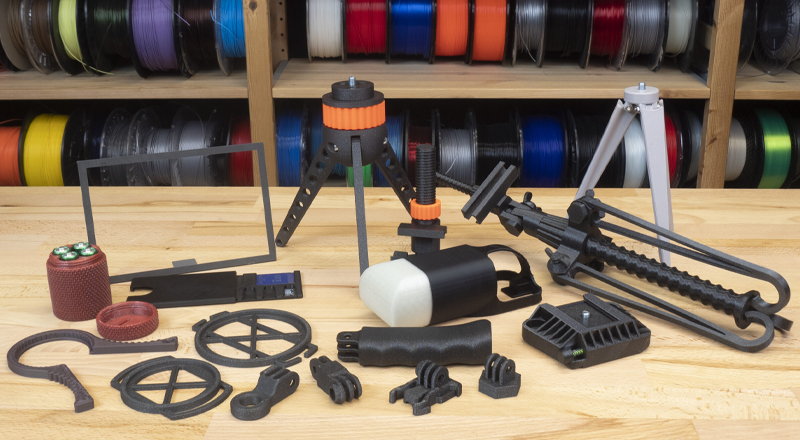
Image 6: Various photography accessories 3D printed with FDM technology. Source: Prusa3D.
Some photography accessories that you can 3D print on your FDM printer are:
- Camera backpack mounts - especially useful for wildlife photographers who require constant camera readiness. Before using a 3D printed mount with a heavier camera, it is important to verify the strength of the 3D printed component before relying on it fully.
- Flash OCF grids and diffusers - instead of improvising it with folded pieces of paper, 3D print your own diffuser. Using a transparent or translucid material such as PETG can prove interesting.
- Wrench set for the lens filter - solves the problem of removing filters that have been tightened too much and takes no time to 3D print.
- Lens hoods - this element tend to be quite costly but a 3D printed one will be as good at blocking unwanted light from entering the lens and thus preventing lens flare.
- Lens cap holders - this simple and quick print will save any photographer time, money and stress of constantly misplacing lens caps.
- GoPro mounts - why give up an excellent idea if you can 3D print any GoPro mount that you cannot find anywhere else? FDM 3D printing offers a wide range of special-task resilient filaments for applications that require flexibility or impact resistance.
- Cases for SD card, batteries, filters, lenses, etc. - great for organizing tiny elements that tend to get lost in the equipment bag and take a long time to find. Plenty of accessories like that can be found on Printables.
- Tripods - you can 3D print your own customized tripod for your professional camera but keep in mind that tripods have various locking mechanisms and rotating parts that will require an advanced material. 3D printed tripods are best to use with phones and GoPro cameras, and professional cameras are best accompanied by a professional tripod.
- Timelapse slider - a professional but affordable timelapse slider can be created with the help of widely available electronics and a 3D printed casing.
- Props - do not limit yourself to practical photography accessories. You can also 3D print props that will make your photos unique.
Scale modeling (dioramas)
Although FDM technology cannot compete with SLA technology when it comes to rendering tiny details and miniatures, there are certain applications where FDM can still give great results in scale modeling, especially the making of dioramas. Dioramas are three-dimensional models that depict a scene or event in a miniature form, typically enclosed within a box or display case. Dioramas are designed to provide a detailed and realistic representation of a particular subject and often include meticulously crafted miniature figures, buildings, landscapes, and other elements such as strategfic lighting that contribute to the overall scene.
Some recommendations for 3D printing dioramas with FDM technology are to use a 0.25 mm nozzle for greater detail and to use ASA filament. Parts 3D printed with this material can be sanded, carved and polished in an acetone bath which will allow you to post-process your parts to your liking. ASA also tends to absorb surfacer, paint and solvent glues frequently used by modelrs very well. Nevertheless, it is possible to use PLA and a 0.4 mm nozzle, just like Michael Mandau did for his "A Mother's Joy" diorama.
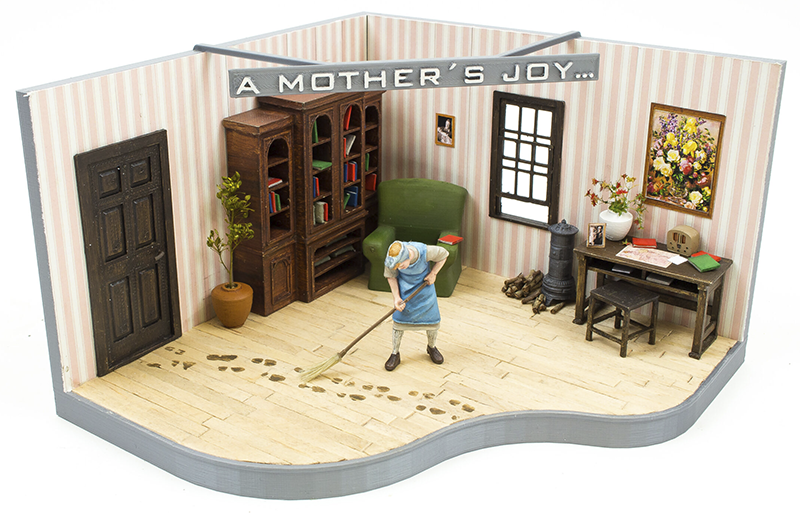
Image 7: A diorama 3D printed with PLA with a 0.4 mm nozzle. Source: Prusa3D.
The room cutaway was constructed in Autodesk Inventor with a size 15x15 cm. The ready file was exported and put into Prusa Slicer. The furniture that the author had downloaded for free from Thingiverse was rescaled to 1:35 in Prusa Slicer. All the elements were laminated and exported for printing. PLA filament was used with the following settings: 0.2 mm layer height (0.05 mm for the furniture), 10 % infill, no supports. It took around 150 g of filament and 11 hours to print all the diorama elements. The only element that was not 3D printed was the woman figure. Then the diorama was painted and decorated with the help of various arts and crafts supplies such as spray glue, adhesive tape, acrylic paint, oil paint, matte varnish, acetone, etc.
Explore the potential of FDM
These five inspiring projects that can be accomplished using desktop FDM 3D printers push the boundaries of what we usually think when it comes to the uses and capabilities of FDM 3D printing. With the right settings, material and post-processing, parts 3D printed on an FDM 3D printer can offer satisfying precision and surface finish adequate for various artistic uses such as scale modeling, tabletop RPG accessories and 3D printed pictures. FDM is also suitable for more functional applications such as personalized photography accessories or fully functioning customized LEGO blocks. With the help of online communities, free downloadable resources and user-friendly laminating software, users can unleash their creativity and carry out fascinating and inspiring 3D printing projects on their dekstop FDM 3D printer with widely available and affordable materials such as PLA, ABS or ASA.